Read: What is Search Indexing and how does it affect searching in Windows?
SearchIndexer.exe High Disk or CPU usage
Many times, the users tend to complain that SearchIndexer.exe or SearchProtocolHost.exe tends to use a very high amount of CPU power or displays high disk usage. This eventually slows down the entire performance of the computer. So, today we are going to check out how to fix this issue. We will be discussing 9 methods to fix this issue. TIP: Indexer Diagnostics Tool will help fix Windows 10 Search Indexer problems.
1] Restart Windows Search Service
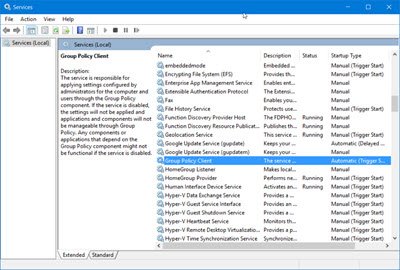
Hit the WINKEY + R button combination to open the Run window. Inside that Run window, type services.msc and hit Enter. This will open the Services Manager window. Inside the Services Manager, you will get a huge list of services that work along with Windows and make things work. So, from the list select Windows Search and right-click on it.
Now click on Properties. Select the Startup Type to Automatic and make sure if the service is running. Now, click on Apply and then on OK. Reboot your PC for the changes to take effect.
2] Run Search and Indexing Troubleshooter
To repair Windows Search, open Control Panel by hitting the WINKEY + X combinations and clicking on Control Panel or search for it in the Cortana Search Box. In the Windows Explorer search section, search for Troubleshooter. You will now observe a menu labeled as Troubleshooting in the search results. Click on it. On the left side panel, click on View All. In the whole list, look out for Search and Indexing. Click on it and run it. Select the Files that struggle to appear in the search results and click on Next. An automated troubleshooting process will now take place. After it is done, Reboot your computer and check if it was able to resolve your issues. Read: How to enable Respect Device Power Mode Settings in Windows 10.
3] Rebuilding the Index
Open Control Panel by hitting the WINKEY + X combinations and clicking on Control Panel or search for it in the Cortana Search Box. In the Windows Explorer search section, search for Indexing Options. You will now observe a menu labeled as Indexing Options in the search results. Click on it. A new window for Indexing Options will open up. On the bottom side, click on Advanced. Another new window will pop up now. Switch to the tab labeled as File Types. On the bottom side, there will be two radio button. Click on the one labeled as Index Properties and File Contents. Now, click OK. Click on the Advanced button again and under the Index Settings tab, click on Rebuild. It will now start to reindex all the files and data stored on the computer. It will take a while, so hang tight and keep your computer work normally without any power interruptions. Check if your issue still persists. Read: Windows Search Indexer is not working.
4] Troubleshooting the issue using the Resource Monitor
To start the Run window press the WINKEY + R button combinations. Type in resmon inside the window and hit Enter. It will now open Resource Monitor. In the Disk tab, check all the instances of SearchProtocolHost.exe. In the Disk Activity Window, you can observe what processes and how many resources is being used by the indexing service. Open Control Panel by hitting the WINKEY + X combinations and clicking on Control Panel or search for it in the Cortana Search Box. In the Windows Explorer search section, search for Indexing Options.
Now, on the bottom portion of the window, click on Modify button. And then click on the directory you want to index in. Click OK to save your changes. Check if your issue is resolved or not. Read: How to fix 100% Disk, High CPU, High Memory usage in Windows.
5] Use DISM or SFC
You may repair potentially corrupted system files with good ones using SFC or repair a corrupted system image using DISM. To do so, hit the WINKEY + X combination and click on Command Prompt (Admin). Now type the following commands: If the first command does not work, try the second one. Wait for the process to finish. Reboot your computer for the changes to take an effect. Now, use the similar method as given above to open Command Prompt with an Administrator-level privileges. Now enter the following three commands sequentially and one by one: Let these DISM commands run and wait until they execute. If the commands given above do not work, try these: Replace the drive letter as per your convenience.
6] Tweaking in a new Administrator Account
Create an Administrator account on your Windows 10 Machine.
Sign in to your new Admin Account and navigate to this path:
C:\Users\Your_Old_User_Account\AppData\Local\Packages
Rename the folder Microsoft.Windows.Cortana_cw5n1h2txyewy as Microsoft.Windows.Cortana_cw5n1h2txyewy.old.
Make sure that Hidden files and folders are visible for the above path to be visible.
Reboot your PC and sign in to the old account.
Now open PowerShell and enter the following command and hit Enter:
Now Reboot your computer again and check if the issue is now fixed or not. If none of these suggestions help you, you may prevent Windows Search from indexing your Drive, or disable Windows Search completely and use an alternative Search freeware.
1] Allow or disallow the disk to be indexed
First of all, open Computer or This PC depending on what version of Windows you are running. Then select and right-click on the partition whose data is not being indexed. Click on Properties. On the bottom side, there will be a checkbox labeled as Allow files on this drive to have contents indexed in addition to the file properties. Check it. Click on Apply followed by OK. Reboot your computer for the changes to take an effect.
2] Disabling Windows Search Index
Hit the WINKEY + R button combination to open the Run window. Inside that Run window, type services.msc and hit Enter. This will open the Services window. Inside that window, you will get a huge list of services that work along with Windows and make things work. So, from the list select Windows Search and right click on it. Now click on Properties. Select the Startup Type to Disabled and make sure that you stop the service. Now, click on Apply and then on OK. Reboot your PC for the changes to take an effect. All the best!