How to add a Timer in Video on Windows 11/10
To add a timer to your videos, you require a video editor that contains a timer feature. For example, you can use the Microsoft Clipchamp app on Windows 11 to put a timer in your video. It comes with a motion title named Countdown Timer that you can add to display a countdown in your video. Besides that, there are some free third-party video editors including Shotcut and VideoPad that can be used for the same. We have discussed the steps to do that in this post, so check out.
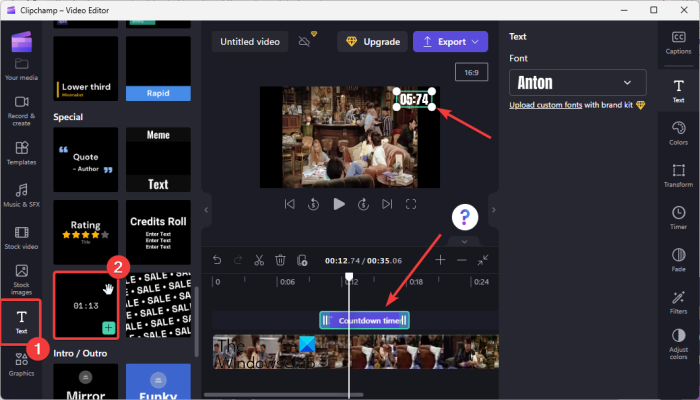
1] Use Microsoft Clipchamp to add a countdown timer to your video
Microsoft Clipchamp is the default video editor app for Windows 11. It is a free video editing app by Microsoft that lets edit or create videos on your PC. It provides a variety of features to edit videos using multiple filters, text effects, graphics, transitions, and many more options. You can also add a countdown timer to your videos with the help of this app. Let us see how. Here are the main methods to add a countdown timer to your video in Clipchamp:
Open Clipchamp.Import the source video and add it to the timeline.Go to the Text section.Select the Countdown timer motion title.Adjust the properties of the countdown timer.Export the output video.
First of all, open the Clipchamp – Video Editor app and then click on the Create a new video option. Now, simply import your source video and then drag and drop it over the timeline. If you want to edit the video, you can do that using various features like split, SFX, add filters, audio editing, adjust colors, transform, etc. Next, from the left-side pane, move to the Text section. And then, scroll down to the Special category. You will see a Countdown timer title. Just press the plus button to add the countdown timer to the timeline. You can now edit the properties of the countdown timer as per your requirements. Adjust the timer’s position and duration using the timeline. Furthermore, you can select the timer from the timeline and then customize its font, color, position, size, fade in/ out effect, filters, and more from the right-side pane. It also lets you split a timer, duplicate it, etc. When you are done adding the timer to your video, click on the Export button and select the video quality (480p, 720p, 1080p) to save the video. The video is saved in MP4 format. However, if the video is less than 15 seconds, you can save it as an animated GIF. If you don’t want to use a third-party video editing app, Clipchamp is a great option to put a timer on your videos. It is easy to use and can also be used online in a web browser. Read: How to add Subtitles to your Videos in Windows 11/10?
2] Add a timer to video using Shotcut
You can also use Shotcut to put a timer in your video on Windows 11/10. It is a great video editor that can be used to create professional and eye-catching videos. It features a variety of filters and special effects that also include a Timer. So, if you are familiar with Shotcut, you can easily add timers to your videos in a few simple steps. Let us see a sorted procedure to do so. You can use the below simple steps to add timers in videos using Shotcut:
Download and install Shotcut, and open it.Add the input video file.Go to the Filters tab and click on the + button.Select the Video > Timer filter.Customize the properties of the Timer.Save the final video.
First of all, simply download and install Shotcut from its official website. And then, launch the main GUI of the software. After that, set up the video configurations and then open the input video file. You can then drag and drop the video from its preview to the timeline for editing.
Now, go to the Filters tab present in the left-hand side panel and press the + button to add a new filter. Next, move to the Video category and then scroll down to the Timer filter. Simply tap on the filter to add it to your video. Once done adding a timer, you can customize its properties accordingly. It lets you edit time format, time direction, start delay, duration, offset, font, text color, outline, background color, thickness, and timer position. After setting up the timer, you can further edit the video using various color correction and grading tools as well as generic filters and video transition options. It also contains editing tools like trim, split, crop, etc. You can save the resulting video in multiple video formats including MP4, AVI, MPEG, WMV, MKV, etc. For that, click on the Export button from the menubar and then select a video codec. Then, tap on the Export File button and save the final video in your preferred video format. Shotcut is one of the best free open-source video editors that you can use to put timers in your videos. See: How to speed up a video and make it faster in Windows 11/10?
3] Add a timer to video using VideoPad Video Editor
Another software that you can use to add timers to videos is VideoPad Video Editor. It is another god fully featured video editor that provides you with a dedicated option to insert a timer in your videos. Using it, you can add different types of timers to your videos including Count, Clock, Stopwatch, Timer, and Digital Timer. How? Just keep on reading. Use the following steps to add a timer to your videos using VideoPad:
Download and install VideoPad.Open VideoPad and add the source video files.Drag and drop the video to the timeline.Go to the Add Objects > Add animated titles option.Select a timer title.Edit the timer.Export the final video.
To start with, you need to download and install this free video editor on your PC. After that, open the software and then import your video files using the Add files button. You can then drag and drop the videos to the timeline from Media Bin.
Now, from the main interface, click on the Add Objects drop-down button and click on the Add animated titles option. Next, select the kind of timer you want to use in your video from Count, Clock, Stopwatch, Timer, and Digital Timer. A dialog box will pop up to edit the timer’s properties. These properties include start time, end time, animation duration, clip duration, alignment, font type, font color, bold, italic, etc. When you are done editing these properties, you can further edit your video as required. Finally, you can export the output video with a timer by clicking on the Export Video button. It supports a good number of output video formats such as MP4, AVI, 3GP, ASF, MKV, WMV, RM, SWF, etc. The advantage of this software is that it lets you save the final video in a device-specific video format compatible with devices like iPod, iPad, Xbox, iPhone, Android, PSP, etc. VideoPad is a powerful video editor with an advanced set of video editing tools and can be used to edit videos with a timer. However, this video editor is free for non-commercial use only. Read: How to add a Mirror effect to Videos?
How do I put a timer on my Windows screen?
To add a timer to your screen in Windows 11, simply open the Clock app using the Start menu. After that, go to the Timer tab from the left-side pane and select a timer based on the duration to add, like a 1-minute timer, 3 minutes timer, and so on. You can also edit the duration of a timer by double-clicking on it. Now, you can either choose the Expand (fullscreen) option or Keep on top (stays on top while you use other apps). Finally, press the Start button to start the timer. Now read: Top 5 free GoPro editing software for Windows PC.