When an individual switch Views, the document will have a different Layout and different tools to edit their documents except for the web view it as mostly the same tools as the print preview; the only difference is that it looks like a web page. The Views include the Print Layout View, Read Mode View, Web Layout View, Outline View, and Draft Layout.
1] Print Layout View:
The Print Layout View is the Default View. It allows the user to see how the document would look if printed.
2] Read Mode View:
The Read Mode is the best way to read a document; it includes reading tools instead of writing. In Microsoft Word 365, there are three tabs in the Read Mode View; these are File, Tools, and View. The Tool menu
Find – Locate text and other content within a document.Search – allows you to learn more about the text you select, pictures, and several results from online sources.Translate – Translate the selected text in a different text.
The View Menu
Edit Document– changes to print view to make changes to the document and use editing tools.Focus Mode – This eliminates distractions so that you can focus on your document.Navigation Pane – it is like a guide to locate your documents quickly.Show Comments– see all comments beside the document.Column Width -Change how to display your document: narrow, default, wide.Page Color – Changes the color of your document; these colors are none, Sepia, inverse.Layout– choose your preferred format to read, column layout, or paper layout.Syllables– shows breaks between syllables.Text Spacing– place text between words, characters, and lines.Read Aloud– read text words and highlight each word while reading.
3] Web Layout:
The Web Layout View shows you how your document would look as a Webpage. This Layout is excellent for wide tables in your document.
4] Outline View:
This View is handy for creating headings and moving a whole paragraph within a document. The Outline View permits you to see your document in outline form where content is shown as bulleted points.
5] Draft View:
Switches the view to just a text in the document so that you can edit and type promptly. Headers or Footers and particular objects will not show up, allowing you to focus only on your text.
Apply different Views to a Word document
The Views are in the View tab on the top left corner in the Views Group. In this article, we are going to explain the Different Views and how to use them.
1] To hide or show space between pages in the Print Layout View
Use your cursor to point to the gap between the pages. Double click the Two Opposite Arrows, and the Gap will hide. Double click on the Line that appears after hiding space to display.
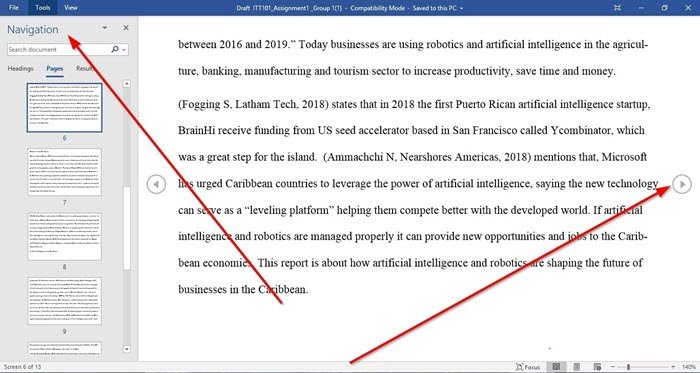
2] To move from page to page in Reading Mode View
Click the Arrows located at the outer edges of the pages. Click View in the Read Mode. Select Navigation Pane. The Navigation Pane allows you to move between Pages, Heading, and Result. To exit the Reading Mode, choose Edit Document, or just press Escape.
3] How to View the Web Layout
Go to the View tab, then select on the top left corner of the View Window, select Web Layout. In the Web Layout View, the document will look like a webpage.
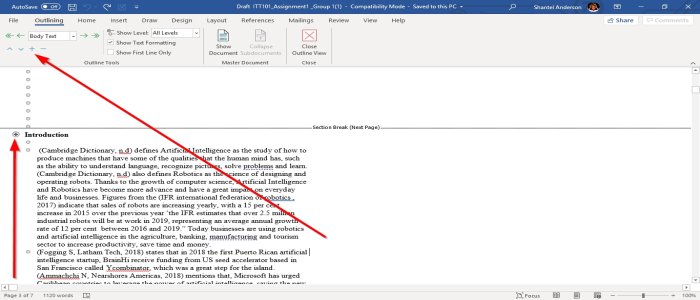
4] How to expand and collapse the section and to reorganize Document in Outline View
To Expand or Collapse sections of the document in the Outline View. The user must first place the cursor beside the paragraph heading, then click the Expand Button or Collapse Button, which is a Plus Sign and a Minus Sign in the top left corner of the Outline Window in the Outline Tools Group. The other option is to double click on the Plus Sign beside the selected section. If you want to reorganize your Document, click on the Plus Sign beside the section. Drag it down or up, or use the Up and Down Arrow Keys on the Outline Tool Group.
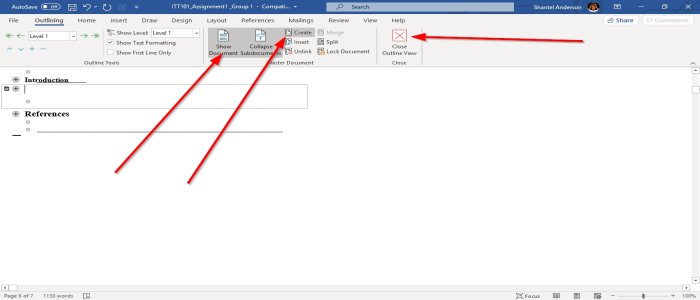
5] How to create and insert sub-document in Outline View
When creating a Subdocument, place the cursor after a heading. Click Show Document in the Master Document category. Select Create to make a Subdocument, it must be embedded after a heading, and you must ensure that Expand Subdocument is turn on. Click on Create. To Insert Subdocument, you should place the cursor after a heading. Select Show Document, next select Insert; a dialog box will appear to select the document you want to put in the Outline View document. Select Close Outline View to exit.
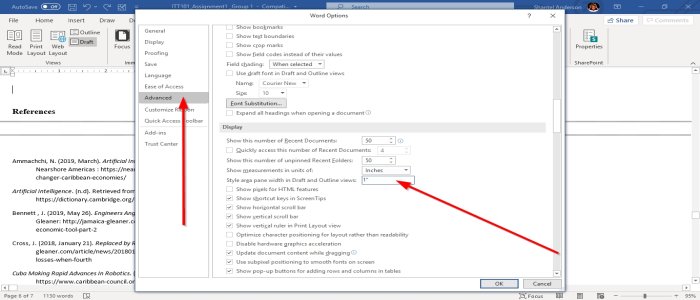
6] How to show and hide styles in the margins of Draft View
In Draft View, there is a way to show the style of the text in your paragraphs. Select file. Click Option, a Word Options dialog box will appear. Select Advanced, a dialog box will appear called Word Options. In the Display Section, enter a Positive Dimension (0.5, 1.5, 1) in the Style Area Pane Width, in the Draft and Outline View. To hide, enter 0. I hope you find the post useful.